Uevent Documentation
- Getting Started
- Welcome
- Features
- Folder Arrange
- Instalation
- Upload
- Fonts
- CSS File
- JS File
- Customization
- Logo Change
- Menu Bar
- Section Styles
- Uevent Utility
- Change Copyright
- Contact Email
Getting Started
Welcome
Thanks for purchasing our template :)
It is our great pleasure that you purchased our template. And we want to tell you that you don't need to write any codes for this template. Just follow some instructions for customizing the template.
If you have any questions, feel free to contact us at mailto:support@thetork.com.
Features
- Different Home Pages
- Total 18+ HTML Files
- Fully responsive
- Clear & Neat design
- Latest Bootstrap 5.X Based
- Font Awesome Icon
- Smooth animation
- SEO Friendly Code
- Optimize Speed
- Browser compatibility (IE10+, Chrome, Safari, Firefox, Opera)
- Well documented
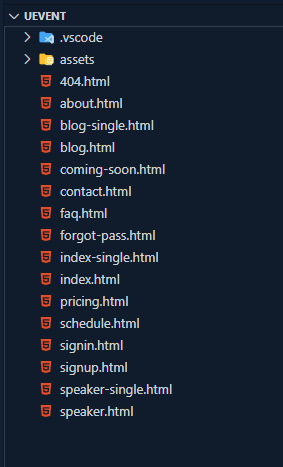
Folder Arrange
Unzip the archive and find out the folder "buyer-file". There are all the template files in this folder. You can open the following files for viewing in browser.
- assets/css — folder with css files.
- assets/fonts — folder with icon fonts.
- assets/images — folder with image files.
- assets/js — folder with Javascript files.
- assets/sass — folder with SCSS files.
- index.html — Home Multi Page.
- index-single.html — Home Single Page.
- and others necessery HTML Files .
Installation
01. FTP Upload
- Open Your FTP manager and connect to your hosting
- Browse to required directory(Normally public_html)
- Upload the files inside buyer-file folder
02. Pages
03. Fonts
We've used google font in Uevent template . You can Change it with any google fonts that you preffer &
also
you can add custom font in sass file---- sass/base/fonts.scss
        //== all fonts importing
        @import url('https://fonts.googleapis.com/css2?family=Inter:wght@100;200;300;400;500;600;700;800;900&display=swap');
05. Source File (CSS)
    <!-- favicon -->
    <link rel="shortcut icon" href="assets/images/favicon.png" type="image/x-icon">

    <!-- vendors css -->
    <link rel="stylesheet" href="assets/css/bootstrap.min.css">
    <link rel="stylesheet" href="assets/css/aos.css">
    <link rel="stylesheet" href="assets/css/all.min.css">
    <link rel="stylesheet" href="assets/css/swiper-bundle.min.css">

    <!-- main css for template -->
    <link rel="stylesheet" href="assets/css/style.css">
06. Source File (JS)
  <!-- vendor plugins -->
  <script src=" assets/js/jquery-3.6.0.min.js">
  </script>
  <script src="assets/js/bootstrap.bundle.min.js"></script>
  <script src="assets/js/all.min.js"></script>
  <script src="assets/js/swiper-bundle.min.js"></script>
  <script src="assets/js/aos.js"></script>
  <script src="assets/js/purecounter.js"></script>
  <script src="assets/js/custom.js"></script>
Logo change
Here is your main logo code. To add your logo, replace logo.png from images/logo/ directory with your logo in PNG format.
<img src="assets/images/logo/logo.png" alt="logo">
Note: Keep your logo inside the ./assets/imaegs/logo folder. The logo size should be minimum 150 X 50 pixel.
Change Menubar
This is Menu navigation codes.
  <ul class="menu">
      <li>
          <a href="#home">Home</a>
          <ul class="submenu">
              <li><a href="index.html">Home Multi</a></li>
              <li><a href="index-single.html">Home Single</a></li>
          </ul>
      </li>

      <li>
          <a href="#about">About</a>
          <ul class="submenu">
              <li><a href="about.html">About</a></li>
              <li><a href="speaker.html">Speakers</a></li>
              <li><a href="speaker-single.html">Speaker Details</a></li>
              <li><a href="schedule.html">Event Schedule</a></li>
              <li><a href="pricing.html">Ticket Pricing</a></li>
          </ul>
      </li>
      <li>
          <a href="#team">Blog</a>
          <ul class="submenu">
              <li><a href="blog.html">Blog</a></li>
              <li><a href="blog-single.html">Blog Single</a></li>
          </ul>
      </li>
      <li>
          <a href="#faq">Pages</a>
          <ul class="submenu">
              <li><a href="schedule.html">Schedule</a></li>
              <li><a href="pricing.html">Pricing</a></li>
              <li><a href="faq.html">FAQ</a></li>
              <li><a href="speaker.html">Speakers</a></li>
              <li><a href="speaker-single.html">Speaker single</a></li>
              <li><a href="signup.html">Sign Up</a></li>
              <li><a href="signin.html">Sign In</a></li>
              <li><a href="forgot-pass.html">Reset Password</a></li>
              <li><a href="coming-soon.html">Coming Soon</a></li>
              <li><a href="404.html">404 Page</a></li>
          </ul>
      </li>
      <li>
          <a href="contact.html">Contact</a>
      </li>
  </ul>
To change the Menu item or menu name you have to edit in the tag <li><a href="#">Your Menu Name </a></li>
If you wanna delete a menu item from the menu just remove the menu item above
Section Styles
Here is your section structure.
      <section class="section-name padding-top padding-bottom">
        <div class="container">
          <div class="section-header">
              .....
          </div>

          <div class="section-wrapper">

          ...sections all content goes there

          </div>

        </div>
      </section>
In the class="section-class" you can replace with your desired class.
the class padding-top and padding-bottom is the space between each sections.
And in the section-header div you can add your heading of sections and tagline of sections.
You can add your content on the 2nd sectionname__wrapper div.
Section With Background
  <section class="section-name bg--white">
    <div class="container">
      ...
    </div>
  </section>
you can select secondary background dark color. To add color, just simply add the class bg--white to the section class.
Utility Classes
You can use next modification classes to set block margins and paddings:
margin-top
mt-1 ... mt-5
margin-bottommb-1 ... mb-5
padding-toppt-1 ... pt-5
padding-bottompb-1 ... pb-5
08. Change Copyright
Change the copy right text as your preference like below
         <div class="footer__copyright">
            <div class="container">
                <div class="text-center py-4">
                    <p class=" mb-0">Uevent © 2022 | All Rights Reserved </p>
                </div>
            </div>
        </div>
Support
If you have any questions, feel free to contact us at mailto:support@thetork.com.